Brush Techniques & Basic Strokes I.
Knowledge of Chinese brushwork is a key to understanding not only Chinese calligraphy but also Chinese painting. In this and the next two chapters, we ex-plore some basic brushwork techniques. We also go over the major stroke types in brush writing, their variant forms, and how they are used to compose Chinese characters. After reading about each technique and stroke type, you will be guided through hands-on practice first writing individual strokes step by step and then tracing the provided model characters.
Pressing Down the Brush and Bringing It Up
The most important feature of the Chinese writing brush is its soft, elastic bristles, which allow variation in the width of the strokes as the calligrapher applies pres-sure to the brush or lifts it up. In fact, calligraphy writing can be seen as a process of alternately lifting up and pressing down. Thus, pressing down the brush and bringing it up are the most basic calligraphic skills. Even when writing a straight line, one needs to vary the thickness of the stroke. Experienced writers are able to control the brush in order to produce desired stroke shapes. Sometimes, at a sharp turn or a point where a change of direction is needed in a stroke, the brush is lifted almost (but not completely) off the page and held delicately poised on the tip before taking off in a new direction.
As can be seen in teh Picture, although the stem of the brush is kept nearly ver-tical, the force applied to the brush tip as it is pressed down is not directly vertical but rather slightly to one side of the tip. This is to keep the hairs all bent together in the same direction. A simple up-and-down lifting motion should produce a brush mark that is pear- or paisley-shaped, with the narrow end pointing to the ten o’clock position. The results of both pressing and lifting can change, depend-ing on the amount of pressure applied. For beginners, brush control requires much practice until the hand can direct the brush at will and produce forms of infinite variety. It also takes considerable practice to produce smooth transitions when the pressure is changed while the brush is in motion.
Let’s pick it up and try a few things.
First, sit up (in the "horse-stand" posture) and hold the brush correctly. With no ink in your brush, try pressing it down on a piece of paper and then lifting it up, as shown at this picture, Repeat this a few times.
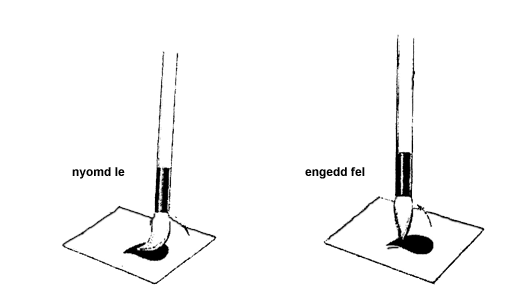
Press down, bring up
Second, dip about two-thirds of the brush in ink and then gently squeeze the bristles along the side of the inkwell to get rid of excess ink.
Now, with ink in your brush, practice pressing down and lifting to make dots on the paper. You may want to try this on normal printing paper first so that you can take your time to gain a feel for how different amounts of pressure interact with the resilience of the brush. Writing on rice paper requires more confidence and experience because of its absorbency; the amount of ink in the brush also plays a bigger role on more sensitive paper.
Next, hold the brush loosely and draw lines of different shapes: straight lines, curves, and zigzags. Try to loosen up your wrist. You will find that the brush will move more smoothly over the paper and produce clearer shapes when it has been freshly dipped in ink. After a couple of strokes the brush will become twisted and dry, which makes it more difficult to create smooth lines. This is when you need to go back to your ink stone to fix the brush and recharge it with more ink. If you load the brush with too much ink, your lines will begin to spread out in blotches on the absorbent paper.
Now, write a horizontal line across the paper, alternately pressing and lifting the brush. Try to make the transitions as smooth as possible. This will also give you a chance to feel the elasticity of the brush. You may also want to draw the lines and patterns shown in the nex pitcure in order to gain more control over your brush.
An Overview of the Major Stroke Types
The most distinctive feature of Chinese writing is that characters are constructed not from letters such as those in English, but from ba-sic units called "strokes." A stroke is one continuous line of writing, made from beginning to end without any intentional break. In alphabetic languages such as English, letters are arranged in a linear order (e.g., from left to right) to form words. In Chinese writing, however, strokes are assembled in a two-dimensional space to form characters. As an example, the word "sun" in English is spelled with letters, s-u-n, that are read from left to right to indicate its pronunciation. In Chinese the character for "sun" is 日, pronounced ri. This character consists of four strokes: one vertical line, a turn, plus two horizontal lines. The strokes do not correspond to sounds, nor do they carry meaning. They are basic materials used to build up characters.
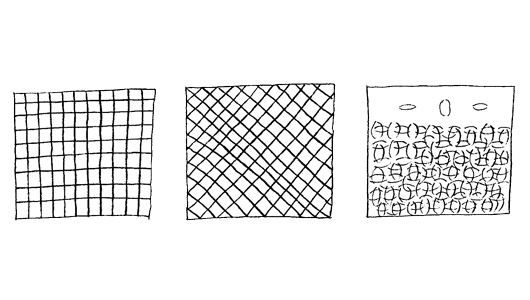
Lines to practice before writing strokes
An initial glance at Chinese brush writing may give you the impression that there are countless ways of writing strokes and that the characters they form are oftenÂforbiddingly complicated. This perception relates to the pictographic origin of Chinese characters. In the early devel-opment of Chinese writing, any line could be used to compose writing symbols. It was only gradually and over hundreds of years that lines in writing were abstracted and stylized into eight major stroke types. The basic forms of the eight major stroke types in the Regular Script of modern Chinese are displayed in the table below.
The horizontal line and the vertical line are the most important, because they determine the overall structure and the balance of a character. The single-direc-tion lines (the first six types in Table below) are the most basic. The last two stroke types, which contain a change in direction, are called "combined strokes".
It should be noted that each of these eight types can appear in varied forms. Just like the seven basic notes of the tempered musical scale, which vary accord-ing to the composition in which they are used, Chinese calligraphy strokes are rendered differently according to the design of individual characters. In actual writing, each calligrapher may also add his or her own characteristics to strokes and characters to produce a personal style—this would be comparable to the same musical notes played on the same instruments but by different musicians. The art of calligraphy employs and combines various forms of the eight major stroke types in a myriad of ways.
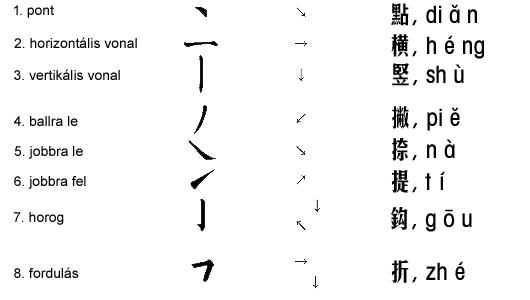
The Eight Major Stroke Types
At first glance, the strokes seem simple. But the simplicity is deceptive. Re-member: your task is not just to draw a line or to make a dot but to reproduce the strokes you see in your model in exactly the same shape. This cannot be done without a great deal of skill and control, which is gained only through practice. A good way to start, even before taking up your brush, is to use your forefinger to familiarize yourself with the steps of writing a stroke, following the numerical sequence marked on the model strokes.
Chinese characters can be written in a variety of script styles. Beginners usually start by learning and practicing the Regular Script, which has the most standardized structure and the most com-plete set of brush techniques. This style is also written with an upright and solemn look. In China, children in elementary schools practice writing the Regular Script before they move on to the Running Script in middle school. The traditional wisdom of calligraphic study dictates that Regular, Running, and Cursive scripts are three stages like standing, walking, and running. We all learned to stand still first, before we attempted to walk and run. Without the ability to stand still, we would fail at walking or running. Learning Chinese calligraphy is the same. The brushwork in the Regular Script is the most basic, with explicit rules. For begin-ning learners, it is the most essential script for the practice of basic brushwork skills and character composition. After learning the Regular Script, you can venture on to other styles of your choice.
Now, keeping in mind the concerns of moisture, pressure, and speed, let’s ex-amine how individual strokes are written.
Dian (点), The Dot
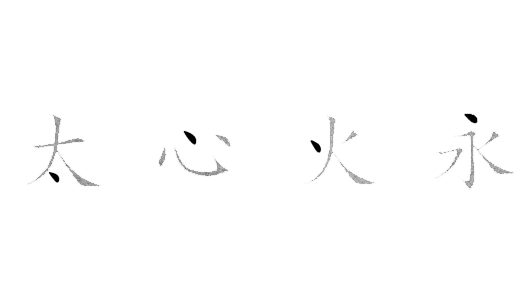
The dot is the most fundamental of the eight basic stroke types because the meth-od by which dots are created is used to write many other strokes. A horizontal line, for example, both starts and ends with the brush movement of the dot, and so does the beginning of a vertical line. Furthermore, although they are usually small in a character, dots play the role of adding vitality to the character as the eyes add spirit to a person. The dot in Chinese calligraphy can be formed in many different shapes. One notable common feature is that they are never circular, as a dot is in English. Instead, the most typical Chinese dot is triangular, as shown at this picture.
Note that this picture the line in the center of the stroke shows the direc-tion of force applied in writing. Do not trace this line with the tip of your brush as if it were a hardtipped pen. Rather, the dot should be produced mainly by pressing down the brush and lifting it up. The trace of the brush is illustrated in (b). Familiarize yourself with this step-by-step procedure before trying to write a dot with a brush.
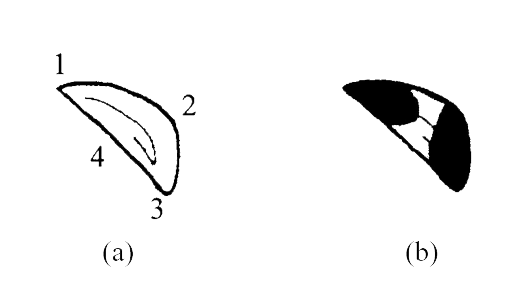
Dot (点)
- 1. Starting from the upper left corner (1), press down at an angle of ap-proximately 45 degrees so that the bottom of your brush reaches (2). Note that although the brush stem is vertical, the force applied to the bristles is not absolutely vertical, but rather slightly diagonal. In other words, when the entire head of the brush is involved in writing, only one side of the brush touches the paper.
- 2. Move the head of the brush slightly toward you and downward so that the bottom reaches (3).
- 3. Push the bristles slightly away from you, to launch the brush in an upward motion toward (4); gradually lift it off the paper.
Examples of dots in complete characters are shown...
Dot (点)
Variations
The dot is the stroke with the largest number of variant forms. How a specific dot should be written has a lot to do with its position in a character. Some dots are quite distinct. When writing dots, you must attend to the details patiently and try to grasp their individual characteristics.
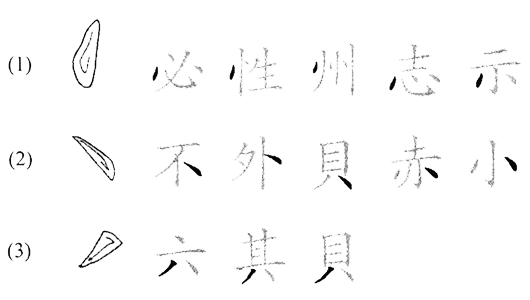
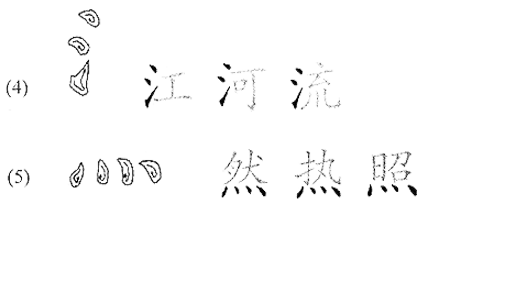
In this picture, the dots in (1) are always on the character’s left side. Those in (2), by contrast, are always on the right side. They are also written in opposite ways. Note that the dots in (2) are longer than the basic dot shown in picture; hence they are named "long dots." The dots in (3) are located at the bottom of characters when two dots are written as a pair, one on the left, the other on the right. The one on the left is always finished with a leftward movement and a pointed ending; the one on the right is slightly longer than a normal dot. They are like two legs on which the character stands and, therefore, should finish on an imagined horizontal line. The characters in (4) have three dots arranged vertically, always on the left side. In fact, the three dots form a semantic component meaning "water," as will be discussed in Chapter 6. Note also that the three dots are shaped differently from one another. The characters in (5) have four dots at the bottom, which are also a seman-tic component meaning "heat." Be careful to observe how each dot is written.
Dot' Variations
The categorization of stroke types, like many other linguistic categories, has grey areas. You may have noticed that picture the dot in (3) looks similar to a short down-left slant, but here it is treated as a dot. This dot always appears in a pair of dots at the bottom of a character like two legs standing, one to the left, the other to the right. A similar case is (4), the last dot at the bottom. Although it looks similar to a right-up tick, it is considered a dot, and it always appears as the last stroke in the component on the left side of a character.
Heng (横), the Horizontal Line
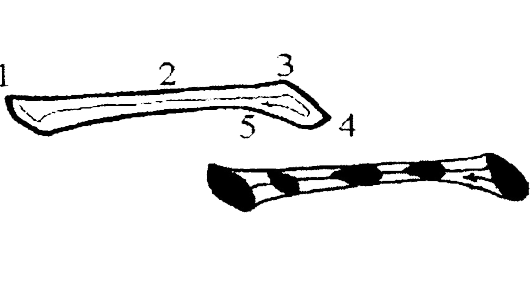
Horizontal lines, like dots, can be written in different ways. Depending on its po-sition in a character, a full horizontal line can function as a top beam (as in 下 xià, "under"), a center sill (as in 六 liù, "six"), or a bottom bracket (as in 土 tu, "dirt"). This stroke often determines the structure and stability of the entire character. Thus it is important that it be written correctly. In shape, a full horizontal line is thicker on both ends and thinner in the middle; the transition should be gradual, as if the line is held at both ends and stretched out. Such a stroke, resembling the shape of a piece of bone, gives the line a look of strength, as shown the picture below. The next picture provides examples of full horizontal lines in characters.
When writing a full horizontal line, follow this procedure.
Heng (横), the horizontal line
- 1. Press down at (1) at approximately a 45-degree angle (the same angle used in writing a dot). The tip of the brush remains at (1) without moving to the right. Pause.
- 2. Slanting the brush handle slightly to the right, move the bristles rightward toward (2), gradually lifting them slightly as the brush approaches the middle of the stroke. The center of the brush tip should remain to the left as the brush moves to the right.
- 3. At (3), lift the brush slightly to bring the tip in line with the rest of the bristles. This should be the highest point of the stroke.
- 4. Press down so that the thickest portion of the bristles reaches (4) at a 45-degree angle (the same angle you used for the first point). Again, this is done without actually moving the brush downward on the paper; the tip of the brush stays at (3).
- 5. Turn the bristles to the left, gradually lifting them as they move toward (5).
Note that the line should be produced with no hesitation. In fact, the brush can speed up slightly when writing the middle portion of the stroke. Because you are using the technique known as center tip, both the top and bottom edges of the line should be smooth.
Variations
In characters with more than one horizontal line, only one of them, usually the longest, is written in its full form. The others are simplified, often at the begin-ning of the stroke, as shown in the picture. Such a horizontal line shows no clear sign of pressing down at the beginning.
Shu (竖), the Vertical Line
A vertical line, like the backbone of a person, plays the role of pillar in a character. As such, it should always be written upright and straight, like a soldier standing at attention. The shape of a full vertical line (thicker at the ends, thinner in the middle) is similar to that of a full horizontal line.
The vertical line is made with similar movements to the horizontal line. Here are the steps to follow.
- 1. Press down at (1) at a 45-degree angle so that the bottom of the brush reaches (2).
- 2. Start moving the brush downward.
- 3. At (3), bring up the brush and adjust the position of the tip so that it fills out the point.
- 4. Press down at a 45-degree angle so that the bottom of the brush reaches (4).
- 5. Move back up toward (5), gradually lifting the brush from the paper.Â
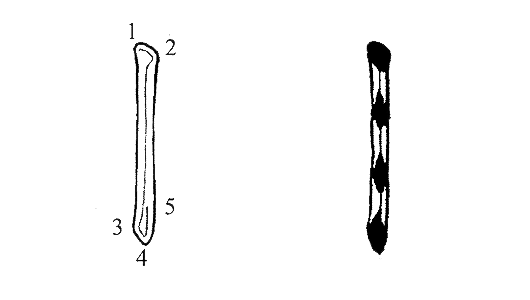
Shu (竖), the vertical line
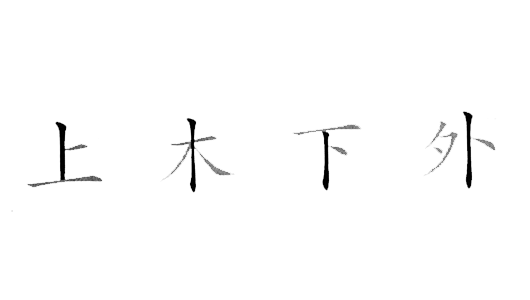
Shu (竖), the vertical line
Tracing
After practicing these three individual strokes, you can write some simple characters beginning with outline tracing using the eight-cell grid. When tracing, try your best to cover the strokes exactly as they are written in the model characters, no more and no less. Although the outline of the characters is provided, you should always be aware of where the center of each character is.
The strokes in each character follow a prescribed sequence. Throughout this book, the stroke order in the Regular Script model characters is indicated by numbers marked on the characters. You should always follow this order in writing, com-pleting one stroke before moving on to the next. Traditionally, the direction of writing a Chinese text is vertical (top to bottom) starting from the upper right corner of the page. Character columns are placed from right to left. This book, however, arranges the practice of individual characters horizontally, from left to right. Concentrate on one character, writing it repeatedly, in order to make sustained progress before moving on to the next character.
Center Tip (中鋒) VS. Side Tip (側鋒)
Tip, (鋒, feng) refers to the brush tip formed by the long hairs in the brush. Writing with the tip of the brush either in the middle of the stroke or on one side of the stroke are two different ways to produce brush lines. The center-tip technique, in which the tip of the brush travels along the center line of the brush stroke, is a means to exert vigor and to produce full, sturdy, firm lines. The side-tip technique, where the tip of the brush travels along one side of the stroke, produces elegant yet delicate lines. The center-tip (中鋒) and side-tip (側鋒) methods are used as the need arises. Good writing with strength is produced using mainly center-tip strokes, supplemented by side-tip strokes.
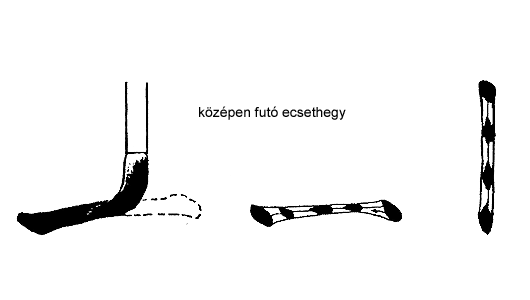
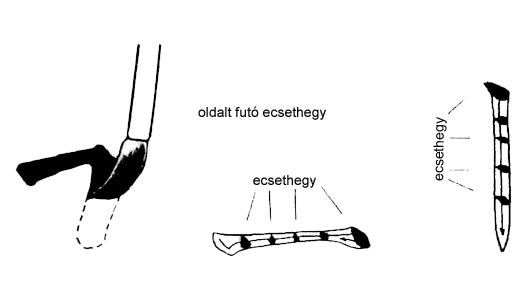
Zhong Feng (中鋒) / Ce Feng (側鋒) - center-tip
Revealed Tip (露鋒) VS. Concealed Tip (藏鋒)
The revealed-tip (露鋒 lou feng) and concealed-tip (藏鋒 cang feng) techniques are different ways to produce the first and last touches of a stroke. In Chinese cal-ligraphy, one can choose to show or hide the first and last touches of a stroke for a deliberate display or understatement of the power of the brush. So far, this book has shown how to start horizontal and vertical lines with revealed tips because the method is simpler. Using concealed tips, an advanced method, adds more strength to a stroke. Therefore concealed tips are used very often, especially for a character’s primary strokes. As seen this picture, to conceal the tip of the brush at the beginning of a stroke, the bristles are contracted slightly, in the opposite direction of the stroke.
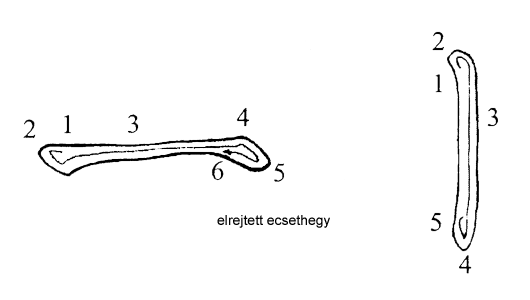
Cang Feng (藏鋒) - concealed-tip
To conceal the tip at the end of a stroke, the brush is brought back again before it is lifted off the paper, ever so slightly, in the direction opposite to the stroke. In the picture, the contractions added at the beginning are (1) to (2); those at the end are (5) to (6) for a horizontal line and (4) to (5) for a vertical line.
To understand the function of the concealed tip, apply one of the basic prin-ciples of physics to calligraphy: for every action there must be a reaction. You crouch down before jumping up; a hammer is lifted up before it falls onto a nail; a leg is swung back before it kicks out and connects with a ball. Similarly, for a horizontal line to be written with strength (from left to right), the brush must move left before it goes right.
The same principle applies to other stroke types. In classical literature on Chinese calligraphy, the concealed tip at the end of a horizontal line is likened to riding a galloping horse toward a canyon and halting abruptly at the cliff’s very edge. In writing, such a technique enables the power of the brush to be kept within the stroke. A good stroke with concealed tips, written with the flow of energy from the writer’s body to the brush tip, increases the sturdiness of the line and gives it a restrained inner strength.
The concealed-tip technique reflects a profound principle in Chinese aes-thetics and philosophy. Starting with Confucius, modesty and moderation have been considered primary Chinese virtues. A refined person is one who withholds strength by concealing his or her cutting edge. This is well captured in the saying "Bu Lu Feng Mang" (不露锋芒), literally "not revealing cutting edge." This saying describes a refined, able person who has inner strength but at the same time is modest and discreet.
Pie (撇), the Down-Left Slant
The down-left slant is characterized by a wide top and a pointed ending. In the picture, (1) shows a revealed tip at the beginning; (2) indicates, with the trace of brush, that the stroke should be written with a center tip; and (3) is written using the concealed-tip method. Follow these steps to write a down-left slant with a concealed tip.
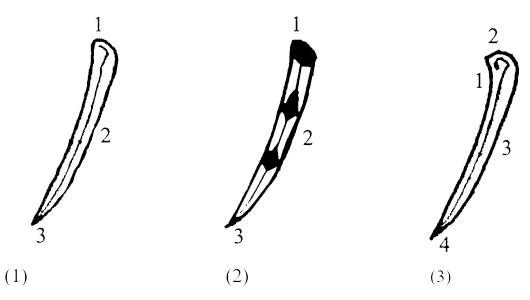
The down-left slant
- 1. At (1), the tip of the brush touches the paper slightly and moves upward to (2).
- 2. At (2), press down at a 45-degree angle and pause.
- 3. Start moving the brush downward and leftward to (3).
- 4. When approaching (4), gradually lift the brush to make a pointed ending.
Variations
The down-left stroke may vary in length, the angle of slanting, and the speed of writing. Compared to the down-left slants in the picture, shorter in length. In traditional Chinese calligraphy treatises, a short down-left stroke is de-scribed as having been written with force and at a fast speed, like a bird pecking at grain. A long down-left stroke, by contrast, is made slowly, with ease, like a woman combing her long hair all the way to the end.
Na (捺), the Down-Right Slant
The down-right slant is characterized not only by the direction of writing, but also by the "foot" at the end of the stroke, shown from (3) to (4) in the picture.The procedure for writing the down-right slant is as follows.
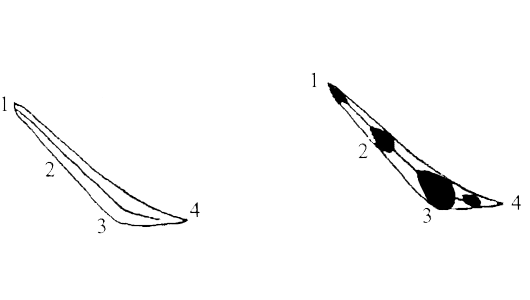
Na (捺), the Down-Right Slant
- 1. Start lightly at (1), moving down and right toward (2) and gradually putting more pressure on the brush.
- 2. Press down hard at (3) and pause slightly.
- 3. Change the direction of the brush, now moving right-ward toward (4) and gradually lifting the brush.
- 4. Make a pointed ending at (4).
Ti (提), the Right-Up Tick
The right-up tick is a distinct stroke that starts from the lower left corner and slants up to the right. The stroke is usually made quickly, with strength, in the following way.
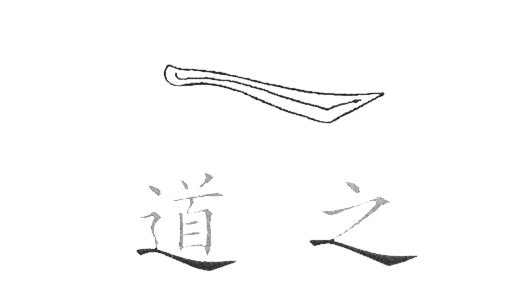
Ti (提), the Right-Up Tick
- 1. At (1), press down (with either a revealed or a concealed tip) and pause.
- 2. Start moving upward to the right (2), gradually lifting the brush.
- 3. Make a sharp ending at (3).
Zhe (折), the Turn or Break
Simply put, the turn is a combination of two strokes with a turn at the joint. The strokes that are combined can be different, resulting in different turns. Here we start with a turn that combines a heng (横, horizontal line) and a shu (竖, vertical line); other combinations will be described as variations in the next section. Follow the steps below when writing the typical turn. You will see that steps 1 through 3 are the same as those for writing a horizontal line.
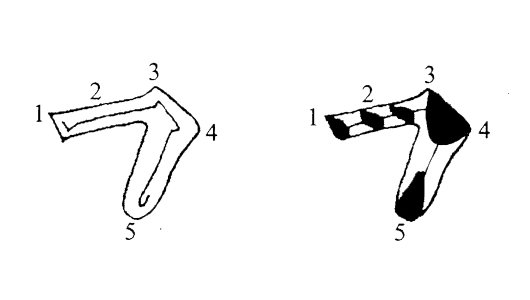
Zhe (折), the Turn or Break
- 1. Starting from (1), press down and move to the right to-ward (2).
- 2. At (3), lift the brush slightly to bring the tip to the highest point of the stroke.
- 3. Press down at a 45-degree angle so that the bottom of the brush reaches (4); then pause. This is done to make the thick turning point. Be sure that the brush tip remains at (3).
- 4. Start moving down toward (5) and end the stroke.
Steps 2 and 3 are crucial for making the turn. This procedure is similar to driv-ing in that one must apply the brakes before making a turn. In calligraphy, however, simply slowing down is not enough. You have to lift the brush to adjust the tip and then press down with a brief pause to make the shape at the turn before moving in the new direction. The combination is considered one stroke because there is no intentional stop at the turn, and the brush is not lifted completely off the paper.
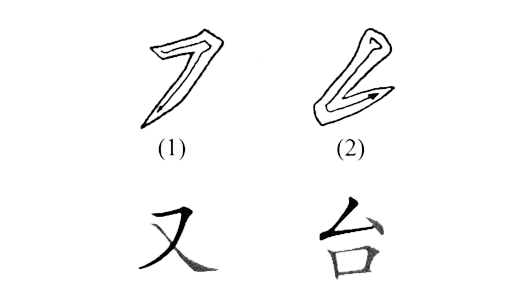
Variations
Different strokes can be joined to make different types of turns. In addition to the above example, a horizontal line can also be combined with a down-left slant, and a down-left slant can be combined with a right-up tick. The writing techniques involved are very similar, as illustrated in the examples in picture.
Gou (钩), the Hook
The hook is a combined stroke because it is always attached at the end of another stroke, such as a vertical or horizontal line. Like turns, hooks involve more writing technique and have more variant forms than a simple stroke. The most common type of hook is attached at the end of a vertical line and usually flows to the left.
Gou (钩), the Hook
A shu (竖, vertical line) with a hook is a difficult stroke for beginners. Here is the proce-dure for writing one.
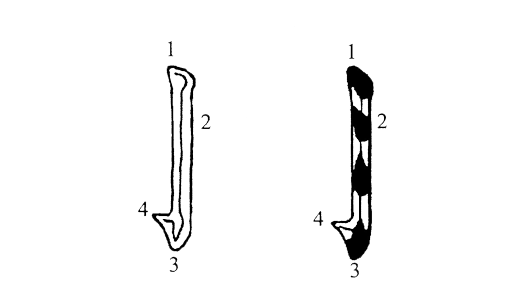
Gou (钩), the Hook
- 1. At (1), press down and pause, as with a vertical line.
- 2. Start pulling the brush downward to the middle of the stroke (2), keeping the brush tip on the center line of the stroke.
- 3. When approaching (3), press down slightly in a leftward motion and pause at (3).
- 4. Move back slightly, and then make the hook to the left, gradually lifting the brush to form the tapering end.
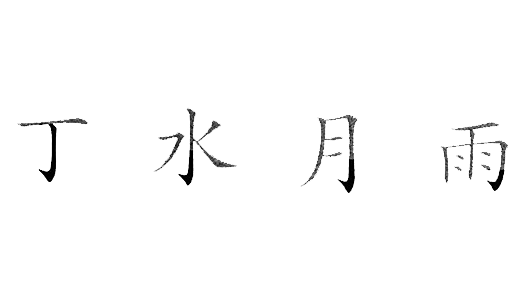
Examples of Gou (钩) in characters
It will take some practice before you can do it right. If written correctly, the hook will look like a goose head turned upside down.
Variations
Hooks can be attached to a number of strokes, although the method of making the hooks is similar in each case. Note that the direction in which the hook is made may vary according to the stroke to which it is attached.
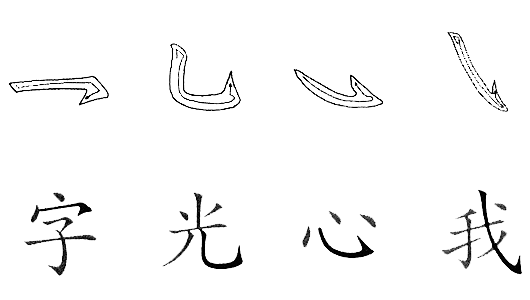
Variations of Gou (钩) with examples
From the examples in the picture we can see that, although there are eight major stroke types, their variations are numerous. Strokes can be further combined. For example, the character 乙 (yi), “second (of the Heavenly Stems),” combines a hori-zontal line with a down-left slant and then, after the curve, with a hook at the end. In actual writing, you will encounter strokes you have never practiced before. At such times you need to use your skills creatively. When basic techniques are intact, creativity can take flight.
Summary of Major Stroke Types
Simple strokes can be divided into two types: straight lines and slightly curved lines. The former include horizontal lines and vertical lines. Although they are straight, they should not look stiff. Slightly curved lines include the down-left stoke, the down-right, and, surprisingly, the dot. These strokes should not be straight but should be made with a slight natural curve. Often strokes with a hook attached are also written with a slight bend, as shown in Figure 5.6. Note also that the part of a stroke that curves is always thinner, while the end of a stroke where the hook is at-tached is thick, an effect produced by pressing down with the brush. Make sure that you attend to such details. If you can produce such minute differences, your strokes will look much better.
Horizontal and vertical lines can vary in relative length or thickness. These variations are determined by the position of a particular stroke in a character. For example, the first horizontal line in 天 tiān, “day/sky,” has to be shorter than the second horizontal line. By comparison, variations in curved lines may be in the direction of a stroke and the degree of the curve. The down-left stroke in 人 rén, “person,” for example, is different from the down-left stroke in 月 yuè, “month/ moon.” The former is a more simple down-left stroke, while the latter starts with a vertical line and then changes into a down-left stroke with more of a curve. Learn-ers should note two important points here. One is that such details should not be overlooked in writing. The other is that strokes of the same type may look different in different characters or even in different parts of the same character. Versatility of strokes is important in the art of Chinese calligraphy.
There is one Chinese character that uses all of the eight major strokes and only those eight. This is the character 永 yoˇng, meaning “eternity”.
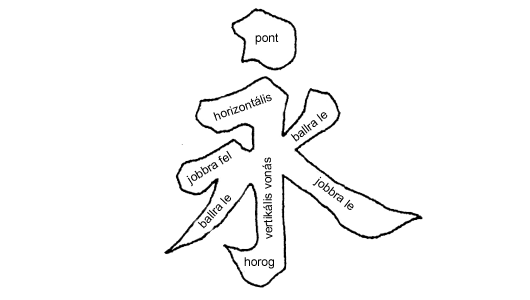
The character yong, “eternity.”
For this reason, the study of stroke types and how they are written is called “the eight methods of yoˇng.” In China, students of calligraphy always spend years practicing the eight stroke types. It is said that, as a young student, Wang Xizhi, the calligraphy sage of the Jin dynasty, spent fifteen years on the eight methods of yoˇng to build a firm grasp of stroke techniques.
The analysis of stroke types has changed over the long history of Chinese callig-raphy. For example, the second stroke in Figure 5.7 has a turn that joins a horizontal stroke and a vertical stroke. However, the turn did not receive much attention in ancient times; it was not even mentioned in calligraphy treatises on the eight-stroke method until the Tang dynasty, when the Regular Script was fully developed. In-stead, the short down-left slant on the upper right side of the vertical line and the long down-left slant on the lower left side were once seen as two different stroke types. Thus the total number of stroke types has remained eight.
Suggestions for Beginners to Avoid Common Pitfalls
Feeling nervous at the beginning is natural. If you are nervous, you may hold the brush incorrectly. As a result, the hand may shake and your writing may be affected. If this happens to you, relax and make sure you are not holding the brush too tight. To help stabilize your writing hand, you may use your free hand as a cushion by putting it under the wrist of your writing hand.
Brush writing is like driving in that the calligrapher, like the driver, should always be in total control. The beginning and ending of strokes are particularly crucial points because they show the quality of strokes and features of the writing style. They should never be taken lightly. Make sure you have a clear plan in your mind for how to write them, and the way your strokes are written should clearly show your intention. In other words, no stroke should be written at random. This is especially important for beginners.
A common beginner mistake is to use the brush like a hard pen, drawing lines without motions of pressing and lifting. Do not drag the brush when writing a stroke, because brush writing involves constant changes in the amount of pressure applied to the brush through pressing and lifting, although the changes may be very slight. When studying model characters, pay special attention to the way the pressure of the brush alters from one point to the next, and try to imitate that without overdoing it.
Some beginners write characters all of which tilt in the same way and to the same degree. This is most likely a consequence of their English writing habits. Un-fortunately, although such a look may be acceptable and even desirable for other scripts, it is considered a pitfall in Chinese brush writing. Every effort should be made to correct this tendency. Sit up when writing and put the writing sheet right in front of you, without turning it sideways. Pay special attention to your vertical lines. They should go straight down with no sideways tilt.
Note the following additional points:
- Do not make indecisive strokes. Before putting your brush down on the paper, have a good idea of what you are going to write; know the shape, size, and position of each stroke within an imagined square; and know how you are going to start, continue, and finish the writing. Once you start a stroke, do not stop in the middle to glance at your model. Even if you slow down, the ink in the brush will keep flow-ing out of the brush and onto the absorbent paper. Your line will begin to spread out in blotches, destroying the momen-tum of the stroke.
- Readjust and recharge your brush frequently.
- A stroke is executed by a single effort, whether it turns out to be good or bad. Touching it up afterwards would destroy its life.
- The ability to develop your own style and to do it well de-pends on good early training and unremitting practice. Prac-tice with patience. Write slowly and pay attention to every detail in every part of each stroke and character. Repeat not for the sake of repetition but for improvement. Every time you write there should be a process of studying, learning, and improvement until your writing becomes satisfactory.

